Before an air duct cleaning: clear 3 feet around all vents and the HVAC unit, replace your air filter, secure pets in another room, remove fragile items near floor vents, and photograph the inside of a vent with your phone flashlight for before/after comparison. Also verify the company is NADCA-certified and get a written quote before work begins.
This checklist walks you through every phase: what to do before the crew arrives, what a professional job actually looks like while it's in progress, what red flags to watch for, and how to maintain your system after the cleaning is done.
Before the Appointment
A little preparation before the technician arrives will make the job go smoothly and help you evaluate the quality of the work afterward.
1. Identify All Your Vents and Registers
Walk through your home and locate every supply vent (where air blows out) and every return vent (where air gets pulled in). Make a mental note of how many there are. Legitimate air duct cleaning companies charge based on the number of vents — typically $25–$50 per vent for a full cleaning — and they should clean every single one. Knowing your count prevents the technician from skipping vents and charging you for fewer than you have.
2. Clear Access to All Vents
Move furniture, rugs, and any objects blocking floor vents. Pull beds away from wall vents. If ceiling registers are blocked by shelving or furniture positioned below them, rearrange what you can. The crew won't rearrange your furniture for you, and a vent they can't easily access may get rushed or skipped.
3. Find and Clear the Air Handler / Furnace
The air handler (or furnace) is the core of your HVAC system and a critical part of a thorough cleaning. Make sure there's clear access — typically 3 feet on all sides — so the technician can work on the blower fan, evaporator coil access panel, and the plenum (the large duct box connected directly to the unit).
4. Locate Your Thermostat and Know How to Turn Off the System
The technician will need to turn off your HVAC system during cleaning. Know where your thermostat is and how to operate it. If you have a smart thermostat like Ecobee or Nest, turn off any auto-schedules for the duration of the appointment so the system doesn't kick on unexpectedly.
5. Secure Pets and Children
Duct cleaning involves loud vacuums, brushes, and compressed air — all of which are alarming to pets and small children. Plan to have kids in another room or out of the house. Dogs should be secured away from the work area; they often get underfoot near floor vents.
6. Get the Quote in Writing
Before the job starts, make sure you have a written quote that specifies the number of vents being cleaned, any add-on services (dryer vent, coil cleaning, sanitizing), and the total price. Never agree to verbal quotes. If additional charges come up during the job, approve them in writing before work proceeds.
Pro tip: Take a quick video walkthrough of each room before the crew arrives. This creates a timestamped record of your home's condition and documents where every vent is located — useful if there's any dispute about what was cleaned.
What Legitimate Companies Do
A real, professional duct cleaning job follows a consistent process. Here's what you should see happening:
System Inspection First
Before touching anything, a reputable technician will inspect your HVAC system — looking at the air handler, checking filter condition, noting the number and type of registers, and assessing whether the ducts are rigid metal, flexible, or a mix. This takes 10–15 minutes and should happen before any quotes change.
Negative Pressure Setup
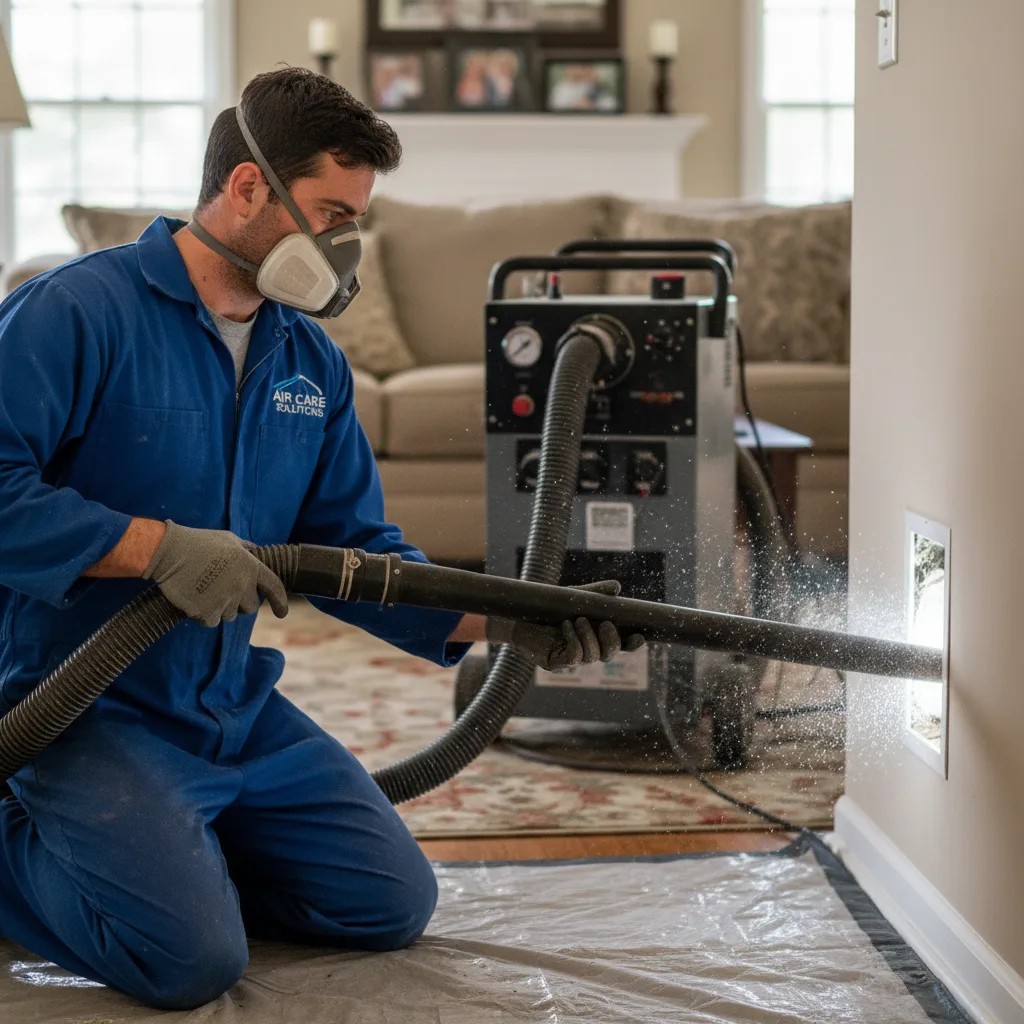
The technician will connect a large, truck-mounted or portable vacuum collection unit to your duct system, creating negative pressure (suction) that pulls all dislodged debris toward the unit rather than into your home. This is the most important piece of equipment in legitimate duct cleaning. If you don't see a substantial vacuum system being set up, that's a problem.
Agitation at Every Vent
Each supply and return vent should be cleaned individually using a rotary brush or compressed air whip that agitates debris off the duct walls. The technician will open each register, insert the tool, and work through the duct run. This step takes 5–10 minutes per vent on average.
Air Handler and Blower Cleaning
The blower fan, blower housing, and evaporator coil access area should all be cleaned as part of a thorough job. The blower fan especially accumulates dust and debris that impacts system efficiency. If the technician doesn't open the air handler, the job is incomplete.
Full Cleaning Should Take 2–5 Hours
For an average home (1,500–2,500 sq ft), a complete cleaning should take 2–4 hours. Larger homes or homes with complex duct configurations may take 4–5 hours. If someone is done in under 90 minutes for a full house, they cut corners.
Red Flags During the Job
Unfortunately, duct cleaning scams are common. Here's what to watch for while the crew is in your home:
⚠️ Walk away (or stop the job) if you see any of these:
- No vacuum collection system: Blowing compressed air without a collection vacuum sprays debris into your home instead of removing it.
- Skipping return vents: Many scam companies only clean supply vents. Returns accumulate dust too — a complete job cleans both.
- Pressure to buy add-ons mid-job: Mold treatment, "antimicrobial coating," or duct sealing being pushed hard once they're already in your home is a classic upsell scam.
- Claiming they found mold everywhere: Scammers often use photos of "mold" (sometimes fake or from another property) to frighten homeowners into expensive remediation. Request a third-party mold test if you're skeptical.
- Job done in under 90 minutes for a full house: Legitimately can't be done that fast.
- Technician can't explain what they're doing: Ask a basic question like "How are you capturing the debris?" A legitimate pro can explain their process clearly.
For a deeper dive on scam tactics, read our guide on how to spot air duct cleaning scams.
After Cleaning: What to Check
Once the job is done, don't just hand over the check and close the door. Do a quick post-job inspection:
Check Every Vent Cover
Walk through each room and verify that every register was reinstalled securely. Registers left loose or improperly seated will rattle, reduce airflow, and eventually fall off.
Inspect the Air Handler Area
Look at the area around the air handler for any debris, disconnected hoses, or anything left out of place. The filter access panel should be properly closed. If the technician replaced your filter, check that it's seated correctly and facing the right direction (there's usually an arrow on the filter frame indicating airflow direction).
Run the System and Check Airflow
Turn your HVAC system back on and let it run for 10–15 minutes. Go room by room and hold your hand over each supply vent — you should feel noticeably stronger, cleaner airflow than before. A musty or dusty smell during the first run is normal; it should clear within a few minutes.
Ask for a Completion Report
Reputable companies provide documentation of what was cleaned, the number of vents serviced, and any findings (like a disconnected duct section or visible mold). Request this in writing. Some companies provide before/after photos.
Check Your Home for Debris
Look for dust or debris around vent openings on the floor and walls. Some dust fallout during cleaning is normal, but significant debris deposited in your home indicates the vacuum collection system wasn't working properly.
Maintenance Checklist Going Forward
Duct cleaning is a periodic service, not a set-and-forget task. Here's what to do between professional cleanings to keep your system in good shape:
| Task | Frequency |
|---|---|
| Replace HVAC filter | Every 1–3 months (check monthly) |
| Vacuum supply and return vent covers | Monthly |
| Check exterior vents for blockage or pest activity | Seasonally |
| Schedule professional duct cleaning | Every 3–5 years (or more often if pets, allergies, or recent renovation) |
| Have HVAC system serviced (coils, blower) | Annually |
| Inspect dryer vent | Annually |
| Check duct connections in accessible areas (attic, basement) | Every 2–3 years |
Filter Selection Matters
The filter you choose has a major impact on how quickly your ducts get dirty. Standard 1-inch fiberglass filters have a MERV rating of 1–4 and catch very little fine dust. Upgrading to a MERV 8–11 pleated filter significantly improves particulate capture without over-restricting airflow for most residential HVAC systems. Don't go higher than MERV 13 without checking with your HVAC technician — high-MERV filters can restrict airflow enough to damage older systems.
Control Indoor Dust Sources
The faster dust accumulates in your home, the faster it accumulates in your ducts. Simple habits make a meaningful difference: vacuuming with a HEPA-filter vacuum weekly, using doormats at all entries, grooming pets regularly (especially shedding breeds), and keeping humidity between 35–50% (which reduces dust mite activity).
When to Schedule the Next Cleaning
The EPA and NADCA (National Air Duct Cleaners Association) generally recommend cleaning every 3–5 years for a typical household. Accelerate that schedule if:
- You have pets that shed heavily
- Anyone in the home has asthma, allergies, or a respiratory condition
- You recently completed a renovation or remodel
- You've moved into a home and don't know when the ducts were last cleaned
- You've had water intrusion, flooding, or visible mold near the HVAC system
Use our cleaning frequency calculator to get a personalized recommendation based on your household.
Get Air Duct Cleaning Quotes
Connect with certified NADCA professionals in your area. Free quotes, no obligation.
🏢 Are You an HVAC or Duct Cleaning Contractor?
Automate follow-ups, reminders, and review requests for every duct cleaning job. GoHighLevel is built for home service businesses that want to grow without adding headcount.
GoHighLevel for HVAC Businesses → Professional Quoting Software →